| source Blueprint with your content 'form' Design the Blueprint This page will act as the 'single source of truth' for the form of the Blueprint. Any changes to this page will 'persist' to wherever this Blueprint is referenced on the site. With this in mind, design the page with a mind towards how it will be used and reused in different places. ( Tip: Brikit typically recommends putting all of your site's Live Blueprint pages in one dedicated space (e.g. with space key of LIVEBLUEPRINTS). This makes it easy to find them again and also to manage permissions for the appropriate editors). Add substitution fieldsAs with Page Blueprints and Space Blueprints, Live Blueprints can use on different pages. Add substitution fields in places where content will be different in each use of the blueprint. Simply add them wherever it makes sense to do so. Remember that part of the power of Live Blueprints is that they allow content to maintain an identical form while having their individual instances include different on-page content (or data). Substitution fields facilitate this possibility.<SCREENSHOT of the Live Blueprint Page. There is an example here (on Confluence 72 with some wonky styling though...): https://confluence72.brikit.com/display/BlueprintPages/Expert+Profile+Plus+Live+Blueprint> Navigate to the Blueprint Definitions PageNow that the source Blueprint has been drafted, it is time to 'define' it as a Blueprint. This is done on the Blueprint Definitions Page. To access this page, do the following: | HTML Wrap |
|---|
| tag | span |
|---|
| class | product-navigation |
|---|
| Confluence header → Gear icon  Image Removed→ General Configuration → Blueprint Definitions Image Removed→ General Configuration → Blueprint Definitions |
Edit and save the JSON file
In the JSON file, the On the Blueprint Definitions Page, click the 'Download Blueprints' button to retrieve the JSON file. Under the "PageBlueprints" array, add a new object to define your Blueprint. The fields are all the same for defining Page Blueprints as they are for defining Live Blueprints, except for one: this is the "type" field. Be sure to set the value of "type" to "live" (note: the default value is "page"). Then save and upload the JSON file. For example: | Code Block |
|---|
| {
"name" : "Expert Profile",
"description" : "A Live Blueprint for generating a common-form Expert Profile.",
"spaceKey" : "LIVEBLUEPRINTS",
"pageTitle" : "Expert Profile Live Blueprint",
"BlueprintFields" : [ "expert-name", "username", "pillar-name", "phone-number", "geographic-location", "building-name", "expert-title" ],
"type" : "live"
}, |
Learn more about Accessing and Editing the JSON File. Upload the JSON fileOn the Blueprints Definition Page, click the "Upload Blueprints" button and upload your JSON File. Unless there is an error (common errors include missing a comma or quote), then you should receive a success message. The Blueprint Definitions Page will refresh to show that a new Page Blueprint of type 'Live' has been added.
Reference the Live BlueprintNow that the Blueprint has been created and defined, it's time to use it. Navigate to, or create, a page where you want to use (AKA 'reference' or 'activate') this Live Blueprint. Edit the page and insert the Live Blueprints Macro. Set the macro parameters| HTML Wrap |
|---|
|  Image Added Image Added
|
Click the Live Blueprint Macro and select "Edit". In the first parameter, include the name of the Live Blueprint (this is the "name" field in your JSON file). You may also skip this parameter and point to the page title of the Live Blueprint, but it is more precise to use the Blueprint name. For example, the "name" of the Live Blueprint in the code above is "Expert Profile" and the "page title" is "Expert Profile Live Blueprint". You may also add or change other parameter values now too. To learn more about these parameters, read about the Live Blueprint Macro Parameters and Key. Save the macro edit screen. Add Read about the other Live Blueprint Macro Parameters. Save the macro edit screen.
Press the "x" key on the page to toggle block editing mode. Under where you placed the Live Blueprint Macro, you will see a button that says "Edit Blueprint". Click it. | HTML Wrap |
|---|
| 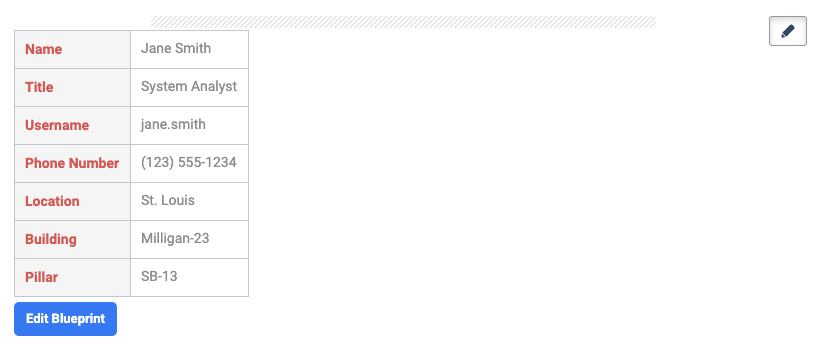 Image Added Image Added
|
A modal window opens that resembles the Blueprint Wizard screen. Type in your unique values for each of the substitution fields then click "Save". You can update these values at any time by repeating this step. | HTML Wrap |
|---|
| 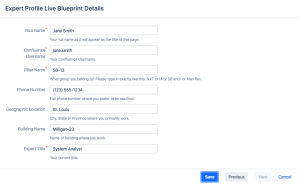 Image Added Image Added
|
Or, add substitution field values in the Live Blueprint Macro bodyIf you don't have Theme Press installed, "Edit the Blueprint" and add values on the page, edit the page and enter the unique substitution field values into the body of the Live Blueprint Macro. Enter the substitution field name followed by an equals sign ("=") and then the value. Each substitution field gets a new line. For example, | Code Block |
|---|
| phone-number=(123) 555-1234
geographic-location=St. Louis
pillar-name=SB-13
building-name=Milligan-23
expert-title=System Analyst
expert-name=Jane Smith
username=jane.smith |
You can update these values at any time by editing this macro body. Save the edit page screen. Back on your Repeat as you see fitYou can insert the Live Blueprint Macro on the page as many times and in as many places as you see fit, each will have their own
| 


