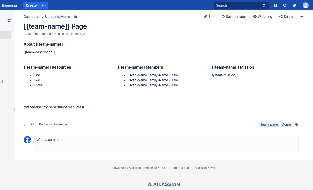
Create your Team Page BlueprintUse the instructions described in Creating a Page Blueprint. For a Team Page Blueprint, we might recommend using substitution fields like [[team-name]] and [[team-description]]. Use a placeholder comment to help you remember where you will reference your Live Blueprint. For example: | HTML Wrap |
|---|
| 
|
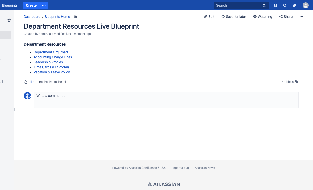
Create your Department Resources Live BlueprintFollow the instructions described in Creating a Live Blueprint. For the Department Resources, you will likely want a list of links and maybe some descriptions. If you'd like each individual Team Page (that is, the pages stamped out from the Team Page Blueprint) to have unique on-page links in this section too, then you'll want your Live Blueprint to include substitution fields here as well. | HTML Wrap |
|---|
| 
|
Define these Blueprints in the JSON FileNavigate to the Blueprint Definitions Page and download the JSON file (or create a new JSON file based on the sample attached to our JSON Reference Page). Follow the instructions on Accessing and Editing the JSON File for adding both the new Page Blueprint object, the Live Blueprint object, and all the substitution field objects. Be sure to set the "type" field value to "live" for the Live Blueprint object.
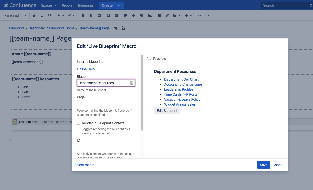
Navigate back to your Team Page Blueprint and edit it. Go to the 'placeholder' section for where you want to reference the Department Resources Live Blueprint and add the Live Blueprint Macro. Be sure to reference the name of the Live Blueprint as specified in your JSON File. Save the macro editor and then save the edit page interface. | HTML Wrap |
|---|
| 
|
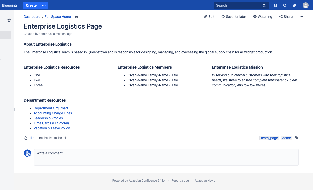
Test the Page Blueprint (optional)In a separate space, navigate to a page and access the Blueprints Menu (in the Confluence Header). Find the Team Page Blueprint and select it, then let the Blueprint Wizard guide you through adding substitution field values. In addition to what was on your Team Page Blueprint, pre-populated with the the substitution field values, the new page should show your Department Resources section. | HTML Wrap |
|---|
| 
|
Test the Live Blueprint (optional)Now let's change the Department Resources Live Blueprint just to show how you a change here propagates to the new Team Page you created. Navigate to the Department Resources Live Blueprint and edit the page (e.g. edit or add a new resource link). Save the page and navigate back to that newly created Team Page. Refresh the page. You should see the new change in the Department Resources section. | HTML Wrap |
|---|
| 
|
| 


